In my previous post Garden Crafts: Pressing Flowers I shared how I have been preserving my garden by pressing and drying flowers and leaves. I thought I would take a minute to share with you some of what I did with those dried pressed flowers. I purchased some blank note cards at my craft store and applied Matte Modge Podge to the card, applied the flower or leaf and then sealed it over with more Modge Podge. I used them immediately to send thank you cards and a birthday greeting and learned they didn’t all travel well. To make sure the delicate petals don’t flake off make sure they are placed on a nice layer of Modge Podge and that they are entirely covered in Modge Podge to seal them in. After I learned this I included a rectangle of parchment paper to protect the front of the card from sticking to the envelope. I also used some elements from my spice cupboard by adding poppy seeds to give it texture and outline the delicate white petals.
Note cards created with dried pressed flowers.Note cards created with dried pressed flowers.
Now that it is autumn in Michigan I have loaded up my flower press with leaves I’ve collected. I am unsure if they will keep their brilliant fall colors but I am hopeful.
I am trying to collect enough flowers and leaves etc. to have on hand the materials to design more cards over the winter and perhaps try framing some to hang on the walls. I hope this has inspired you to “harvest” items from your garden in a new way. Enjoy!
I’ve dreamed of growing flowers that can be cut and used in floral arrangements. Unfortunately, my cats prevent me from having nice things including houseplants, cut flowers and nice furniture. The tuxedo cat is Simon (the destroyer of floral arrangements) and the tabby cat is Kimber (the destroyer of houseplants).
Years ago my mother-in-law gave me her flower press which consists of two wooden boards held together with screws and wing nuts. It contains layers of paper to absorb the moisture in the plants. I refreshed the old paper and replaced it with cardboard, construction paper, paper towels and parchment paper. I positioned the fresh flowers between the paper towel and parchment paper to both prevent sticking and absorb moisture. Of course you don’t need a flower press, a heavy book will do. You can speed up the process by using the microwave (YouTube tutorial here: https://youtu.be/IIb879Uhda8) however you will not be able to get them as flat as the flower press which is an important detail for some projects. I marked my calendar and tightened the screws after a week and removed them after two weeks. Your results may vary depending on the types of flowers and conditions in your home.
I was most impressed by the roses which flattened out and dried into cute little button shapes. The petunias surprised me by starting out red and ending up purple!? The pressed petunias were translucent, delicate and painfully thin. I was disappointed that the nasturtium lost some of the painterly effect seen in the leaves prior to drying. The small coreopsis petals hung together well and dried beautifully.
I decided that the best way to store these delicate beauties would be under sheet protectors. I filled the sleeves with card stock and gently placed the dried flowers, leaves and ferns into the sleeve. The static under the plastic was frustrating for placement but was just what I needed to keep them from falling out. Now I have a binder to help me store and collect the delicate specimens. Next, I will use Modge Podge to fasten them to greeting cards or position them for framing.
My bedroom has floral Audubon prints and I imagine framed pressed flowers will be a welcome addition. I hope that preserving the garden in this way will reminded me of the warm summer months when we are deep in a Michigan winter.
We are on day 27 of our Stay Home/Stay Safe order here in Michigan, USA and it has been 31 days since the President declared a National Emergency. I did a pretty good job of stocking up on essentials and preparing our family for 30 days of sheltering in place (only taking trips to the pharmacy and bank so far) however I forgot one thing… dog treats. Our dogs, Gracie and Louie are accustomed to getting treats every day at bedtime (this started as an attempt to keep their bellies full so we could sleep in on the weekends) and occasionally in the afternoon just to break up the day and add a little excitement. But no worries I told myself… I can make some!
I needed to make some important exceptions because we avoid peanuts (my daughter is allergic) and we use a largely plant based diet so we did not have a lot of bacon lying around or liver etc to add flavor. Many recipes used peanut butter as a central ingredient in dog biscuits and was the hardest to work around. Substituting almond butter felt too decadent knowing the price tag. After a couple hours of reading I went with a basic recipe from http://www.mkclinton.com Barking From The Bayou which included whole wheat flour, cornmeal, oil and water. I added some of the other popular ingredients that I stumbled across in my research: carrots and broth. My daughter emerged from her room while these were baking and wondered if I was going to serve her beef stew with egg noodles! They did smell pretty tasty and, I did taste them (why not? they are all human grade ingredients) and they were savory and mild with a meaty aftertaste. I do want to highlight that I used sodium free beef bullion so be careful not to make yours too salty if you use a different product.
Beef Stew Style Dog Biscuits
1/2 cup cornmeal
2 cups whole wheat flour
6 tbs vegetable oil
2/3 cup water
3 packets of granulated sodium free beef or chicken broth
1 finely grated large carrot
pinch of salt
white flour for dusting the board
Preheat oven to 350F degrees. Line two cookie sheets with parchment paper. Mix all ingredients together in a large bowl. Allow dough to start off a little dry because carrots will impart moisture. Knead the dough on a floured board until smooth. Roll out to 1/4″ thick and use cookie cutter to form shapes, press firmly to cut through bits of carrot. Bake for 20 to 30 min switching trays around halfway through. The biscuits should be dry, hard and lightly golden. Store in air tight container for up to two weeks, they can be frozen for up to 3 months.
Notice the dough is a little dry allowing the moisture in the carrots to deliver a supple dough.
The dough is smooth with flecks of carrots. I used a medium bone shape and a small fire hydrant shape. Important: The sharp edges of these metal cutters help to cut through the carrot pieces.
These biscuits can be crowded because they will not spread.My cat Kimber was not impressed. Louie is a gobble monster!
On November 22, 2018 in North America, most of us celebrated Thanksgiving. This is a feast day to commemorate 17th century European colonization. As children we are told a big meal was served to celebrate the settlers successful preparation for the impending winter and Native Americans peacefully took part. The Native Americans don’t feel this warmly about the day however.
This year, we bucked the trend and instead of making a turkey we chose to roast a leg of lamb and tried our hand at making a seitan “turkey.” Of course we started out searching the internet and read a bunch of different recipes and selected this as a starting off point. Sylvia Bass on her web site Cookie Chicka has a lot of nice photos to accompany her recipe so that you can follow along with confidence, and they helped. Overall the recipe contains vital wheat gluten, beans, chick pea flour, nutritional yeast, vegetable bullion or “poultry flavored” bullion and spices. Mix all ingredients and steam them in a foil tube for one hour and then bake for 30 min. I did not have a large enough system to steam all the ingredients in one tube of foil so I did two and I didn’t have chick pea flour so I used the entire can of white beans.
Turkey Loaf baking alongside our leg of lamb.
Turkey Loaf after baking
I found it to be a lengthy process but the results were pretty satisfying. The Turkey Loaf sliced easily and was tender and had all of the flavors we expect for a traditional Thanksgiving meal. I served it with mushroom gravy, mashed potatoes and broccoli; it was a satisfying meal. I used ‘Herbs de Provence’ a blend of rosemary, thyme, marjoram, savory and oregano which made it taste a lot like stuffing (a seasoned casserole of bread cubes, carrots, onions and celery with lots of regional variations) which I was not serving so I went for it knowing it would make up for it’s absence.
Turkey Loaf being sliced
Sliced Turkey Loaf
Leftovers…
So the reheated Turkey Loaf was just as delicious the following night. It will allow you to get thin slices and would easily make a nice sandwich filling. Here is a list of ideas for what to do with the remaining servings:
Mix in with scrambled eggs along with bell peppers. (see photo)
Grill thin slices and serve as sandwich filling.
Toast and serve as a salad topper.
Add to pasta with tomato sauce.
Cube and add to pizza toppings.
Here I browned small cubes in oil and used them in an omelette with bell peppers and onions and topped with cheese. We all agreed that I could have added more browned Turkey Loaf because the flavor was welcome and served almost as a sausage stand in.
I think that this seitan recipe would be easily adjusted to different flavor profiles like:
Italian sausage
Gyro or Greek Seasonings
Fajita/Mexican
Please comment if you have other recipe ideas or seasoning suggestions.
This summer I did a good deal of gardening. I came across a large inexpensive planter and was inspired to grow an elephant ear bulb for the first time. I was intrigued by the idea that I could make a small investment (I think I paid around $7.00) and get a long lasting “pet” of a plant. My elephant started as a softball sized root ball and I put it in the center and planted Caladium around it.
Here is the planter after one month.
The planter lived on this ugly cement slab in my backyard on the south east side of the house. It required daily watering and regular feeding to get the leaves to measure up to 20 inches long and shoulder height (I regret I did not get a photo of it when it was large) but it was a cheerful companion in the garden and did a nice job of adding some lushness and covering up an ugly recycling hopper.
I understood that after a hard frost I could bring in the root ball and plant it again next year. I watched a couple YouTube videos to get some instructions. This was the most useful.
Here are some photos of what I found on October 21st in Michigan so I went to dig up my Elephant.
After the first frost.
Root ball dug up.
Here you can see the original bulb.
I wanted to overwinter the Caladiums however many were missing and the ones I found were slimy. If you look closely you will be able to see the multiple off shoots that grew from the one bulb that gives me hope that I will have a lot of plant growth next year.
So my Elephant is going to hang out in this box in the basement for the winter. I am going to check on it frequently to make sure it is not too moist or too dry etc and then leave it alone. Fingers crossed.
My husband and I were honored to attend a dinner titled Toward a FutureLand: Ceremony To Honor the Land and Welcome the FutureBuilders hosted by the Arcus Center for Social Justice Leadership at Kalamazoo College. The Center brought together an astonishing collection of people from around the world who are engaged in global struggles for land, examining the commodities and consumption of space as well as the reach and watch of colonial and corporate power. Theywelcomed conference participants and representatives from:
Associacion National De Afrocolombianos Desplazados (AFRODES)– Bogota Columbia
The conference theme, Toward a FutureLand (which I did not attend) facilitated discussions exploring land as essential to indigenous sovereignty, strength and nurturance. It is these types of educational experiences that make Kalamazoo College award winning, and I am proud to be an alumni.
The dinner’s food dancing and music were provided three bands of the Potowatami Indians (Gun Lake Band, Nottawaseppi Band and the Pokagon Band.)
Buffalo and Posole Stew with Salmon, green beans and salad.
It was especially nice for us to be able to meet the Tewa women from New Mexico because we lived in Santa Fe, NM for 12 years and we were happy to have lived and worked among many Pueblo Indians.
The dinner was a powerful combination of people and ideas that focused on the impact of colonialism and the ways that native people continue to be marginalized, most notably seen in the shocking pattern of missing native women in the US and Canada.
Beautiful Jingle Dress Dancers
The event included a Water Ceremony, reminding us all that however far away each groups individual missions are, we are all joined by our shared need to protect our land and water. This was made more personal highlighting how locally, the Kalamazoo River and more broadly the Great Lakes, are threatened by corporate agendas that put the movement and sales of oil ahead of the protection of our water. Andrew DeGraw with Kalamazoo Remembers helped close the ceremony and shared some shocking information about Enbridge Energy’s behavior in our community even after being responsible for the second largest inland oil spill in U.S. history in July 2010. According to Wikipedia the largest was the 1991 spill near Grand Rapids, Minnesota.
Most days I take it for granted that clean water will run out of my taps. However, in Michigan it is becoming more and more clear that we can no longer assume corporations share our interest in protecting our water. Between the Flint Water Crisis and our current concerns regarding PFAS chemicals in Parchment Michigan’s water it is clear something needs to change.
I encourage you to click on one or more of the links I have provided, once you have been made aware, you begin to change; just like you can not separate out each drop of water from the ocean.
In Spring 2018 we added two dogs to our family of three humans and two cats. Of course certain chores accompany pet ownership and I am the person most often on poop patrol. I got this job for a couple of reasons, but primarily they all lead back to… I don’t want to step in poop. Interestingly this morning as I was scanning for poop (and sticks) preparing to mow the lawn, I noticed that there was a lot going on down there.
I attribute these mushrooms to years of mulching grass clippings and fallen leaves into the lawn and not to dog poop, but I could be wrong. Here is what I learned:
The Jack-O-Lantern mushrooms will glow in the dark faintly and make you very very sick if eaten.
The Stinkhorn Mushroom really does stink and looks like severed fingers after you mow over it in the lawn…gasp!
Meadow Mushrooms
I am giving this impressive collection its own slideshow so you can see how big it is and how cheerful in the lawn.
This slideshow requires JavaScript.
Others I found..
I’m trying to refrain from putting in a silly amount of photos..
This slideshow requires JavaScript.
So, to be fair those amazing Jack-O-Lantern Mushrooms were growing down the street from me and not in my lawn however they are so impressive I knew you would want to see them. I am confident that these are correctly identified because I asked my uncle John Trestrail and he is a poison specialist, he said don’t eat them. I guess eager mushroom hunters can mistake them for Chanterelle’s. There was at least one other mushroom out there that day but I could not figure out what it was, and I am certain that I may have mislabeled some here, so if you know better leave me a comment.
Back to the little stinkers…
So it felt wrong to introduce my menagerie of pets (and their poop) without including photos of them so here we go…
This slideshow requires JavaScript.
Yes, all of the sweaters are knit by me, one of the perks of owning small dogs in Michigan. Cats are not any fun to knit for however, they do like a plush knitted square to sit on year round.
Next time you get a good rain, stop to study what is growing, it may be far more then you ever imagined.
So this summer heralded a lot of lifestyle changes for my family and, having more time than money I thought I would try to grow some vegetables. I was inspired by what I found in my shed: decades old EarthBox’s. An EarthBox is a planter that is designed to be filled with potting soil, fertilizer + lime, covered in plastic and watered through a tube. In addition to the three planters I already owned, I inherited three from my mother-in-law so I knew I could grow a lot of plants and have a generous bounty.
EarthBox’s being prepared for planting. I used trash bags and duct tape instead of ordering their specialized cover.
EarthBox’s on day one and day 31.
As you can see I was pretty determined to avoid weeding, and mowing around planters (been there, done that, no thanks.) I put down weed barrier fabric and bark mulch; to keep everything in place I used a handy edging system. This year we also added two small dogs to our family and keeping them away from my veg was important (read: don’t pee on the veg.) By creating a permanent home for the container garden I hoped I could allow the planters to overwinter in place and get refreshed with new fertilizer and topped off with potting soil, covered and replanted in the spring. I put the planter’s on 2×4’s, in case they needed to be moved and to avoid the drain holes getting clogged by bark mulch.
If you are a skilled gardener you may notice my naive belief that the tripod I constructed would be adequate support for SIX cucumber vines. I have never met a cucumber vine, I just know we like cucumbers and I quickly had to build another 8 foot tall tripod as well as a trellis on the deck railing to support the vines. In the end I think the vines grew about 20 feet long and climbed over 10 feet high.
Six Burpless Cucumber Vines finding their way up a tripod and trellis.
I also learned something about the difference between determinate and indeterminate tomato plants. Because the entire project was born out of a desire to have vegetables and do very little work I did not take seriously the invitation to “pinch” tomato plants. This failure triggered the construction of more 8 foot tall tripods to respond to a 12 foot tall tomato plant. No, not even at this point did I think about pruning, I think I was so delighted to watch everything grow. Eventually my daughter and I cut off the tops of the tomato plants because we couldn’t build anything tall enough to support the heavy fruits.
June 27th- My in-determinant tomato plant has a mind of its own, cute at first but then just crazy.
Taking Stock: What I Would Do Differently.
I put one bush style Roma tomato and one slicing tomato in an Earthbox. I think I would avoid this configuration in the future. The slicing tomato got huge and took all of the water and nutrients and the Romas did poorly. While I will want four tomato plants again I need to rethink who bunks with whom.
I planted one EarthBox with six bush style green beans. This was a lot of fun and I was able to pick green beans everyday and by the end of the week we had a healthy collection of beans to eat on Saturday. The plants continued to provide beans all summer and we would still be in October if a bunny had not taken out a lot of the plants.
I put six pepper plants in one EarthBox; this was pretty successful and I would have gotten more bell peppers if I had staked them better. One plant was badly broken under the weight of the fruit. I talked about my pepper projects in a previous blog post: Hot, Hot, Hot! In the future I won’t need to grow hot peppers and if you have any suggestions for what to plant leave me a comment.
In another EarthBox I planted six different herbs, and other then the quickly wilting cilantro this was a brilliant success. I also planted some Chocolate Mint and Dill in flower pots and was able to harvest and dry a lot of herbs.
The planter full of cucumbers was amazing and was so much fun that I would definitely repeat this set up next year, especially since I have the trellis and tripod already constructed.
This slideshow requires JavaScript.
The biggest disappointment and hiccup in the process was running out of nutrients and the development of blossom end rot. The indeterminate tomato took a lot of nutrients and water, as did the cucumbers and because I am a low work, high yield sort of a gardener I didn’t think to begin watering twice a day and providing supplemental fertilizer until the plants were already stressed. Next year I will be sure to add a richer fertilizer when prepping the boxes and begin using a water based fertilizer about 8 weeks in or at the first sign of stress. The EarthBox website makes the claim you can get your entire yield from the fertilizer put into the potting soil before planting. Maybe that can be accomplished with their proprietary blend but not with what I was using. Both the tomato and cucumbers got yellow leaves but eventually responded well to epsom salt and miracle grow added with weekly waterings.
For next year I still have some questions:
When do I stop providing plant food?
How do I know when a plant will stop giving fruit?
If one plant appears done for the season will it harm the others to cut it off at the soil level? Or should I just leave it until I pack up all the plants for the season?
Do I overwinter with the plastic covering on? or off?
How many years can I reuse the potting soil before I should just toss it all and start fresh again?
If my tomatoes did not get as large as stated on the label is it because of light or nutrients?….or both?
I think the project was a success and it gave my family of three enough produce to keep things interesting and to put some food aside for the winter months. If any of my readers have suggestions or feedback it is most welcome.
So here in Michigan a fall chill or even full-on winter weather has been known to come too early. Notably, we often have to send our kids out to trick or treat in their coats and one year it snowed on Halloween! I am not sure when it started, but somewhere along the way I made it a point of personal pride to avoid turning on the furnace until the last possible moment. September is totally unacceptable and if you’re such a cupcake that you turn on the heat this early, then yes, the rugged people of Michigan are judging you. Now that it is October we are getting into some marginal territory; where it is acceptable in *certain circumstances* however, not fretting about your gas bill when you open the door 50 times for trick or treaters is the real treat.
Here is a Weather Channel chart for when the first snow can be expected. If your area is not listed, follow the link below for other regions in North America. In 2006 we had record snowfall on October 12… these are the certain circumstances mentioned above.
Portage Michigan is about half-way between Chicago and Detroit so there are two techniques I use to maintain my ability to proudly say “I have not turned on my furnace yet” even when the temps get chilly:
Use the oven
knitting
Making a pumpkin pie or roasting some vegetables is a great way to get your kids to stop complaining about the cold. Here is what I prepared today …
Roasted brussels sprouts, potatoes and cauliflower rice drizzled with Siracha.
This was a good way to keep the oven on for at least 45 min shoveling trays in and out at 425 degrees. Just in case I am the only one who eats the brussels sprouts I baked an Apple Dapple Cake (sans frosting) to make sure everyone has a full tummy.
I could not bring myself to add the frosting after dumping two cups of sugar into the batter. The cake kept the oven on for one hour and we are all pretty happy about that with overnight temps in the 40’s.
The other approach is knitting. This is the time of year we start wearing hats in the house; including snuggly sweatshirts, socks and scarves. I have just finished knitting for my new grand niece and can begin everyone’s hat for this year any time. Here is a collection of hats made last year; most of them gifted.
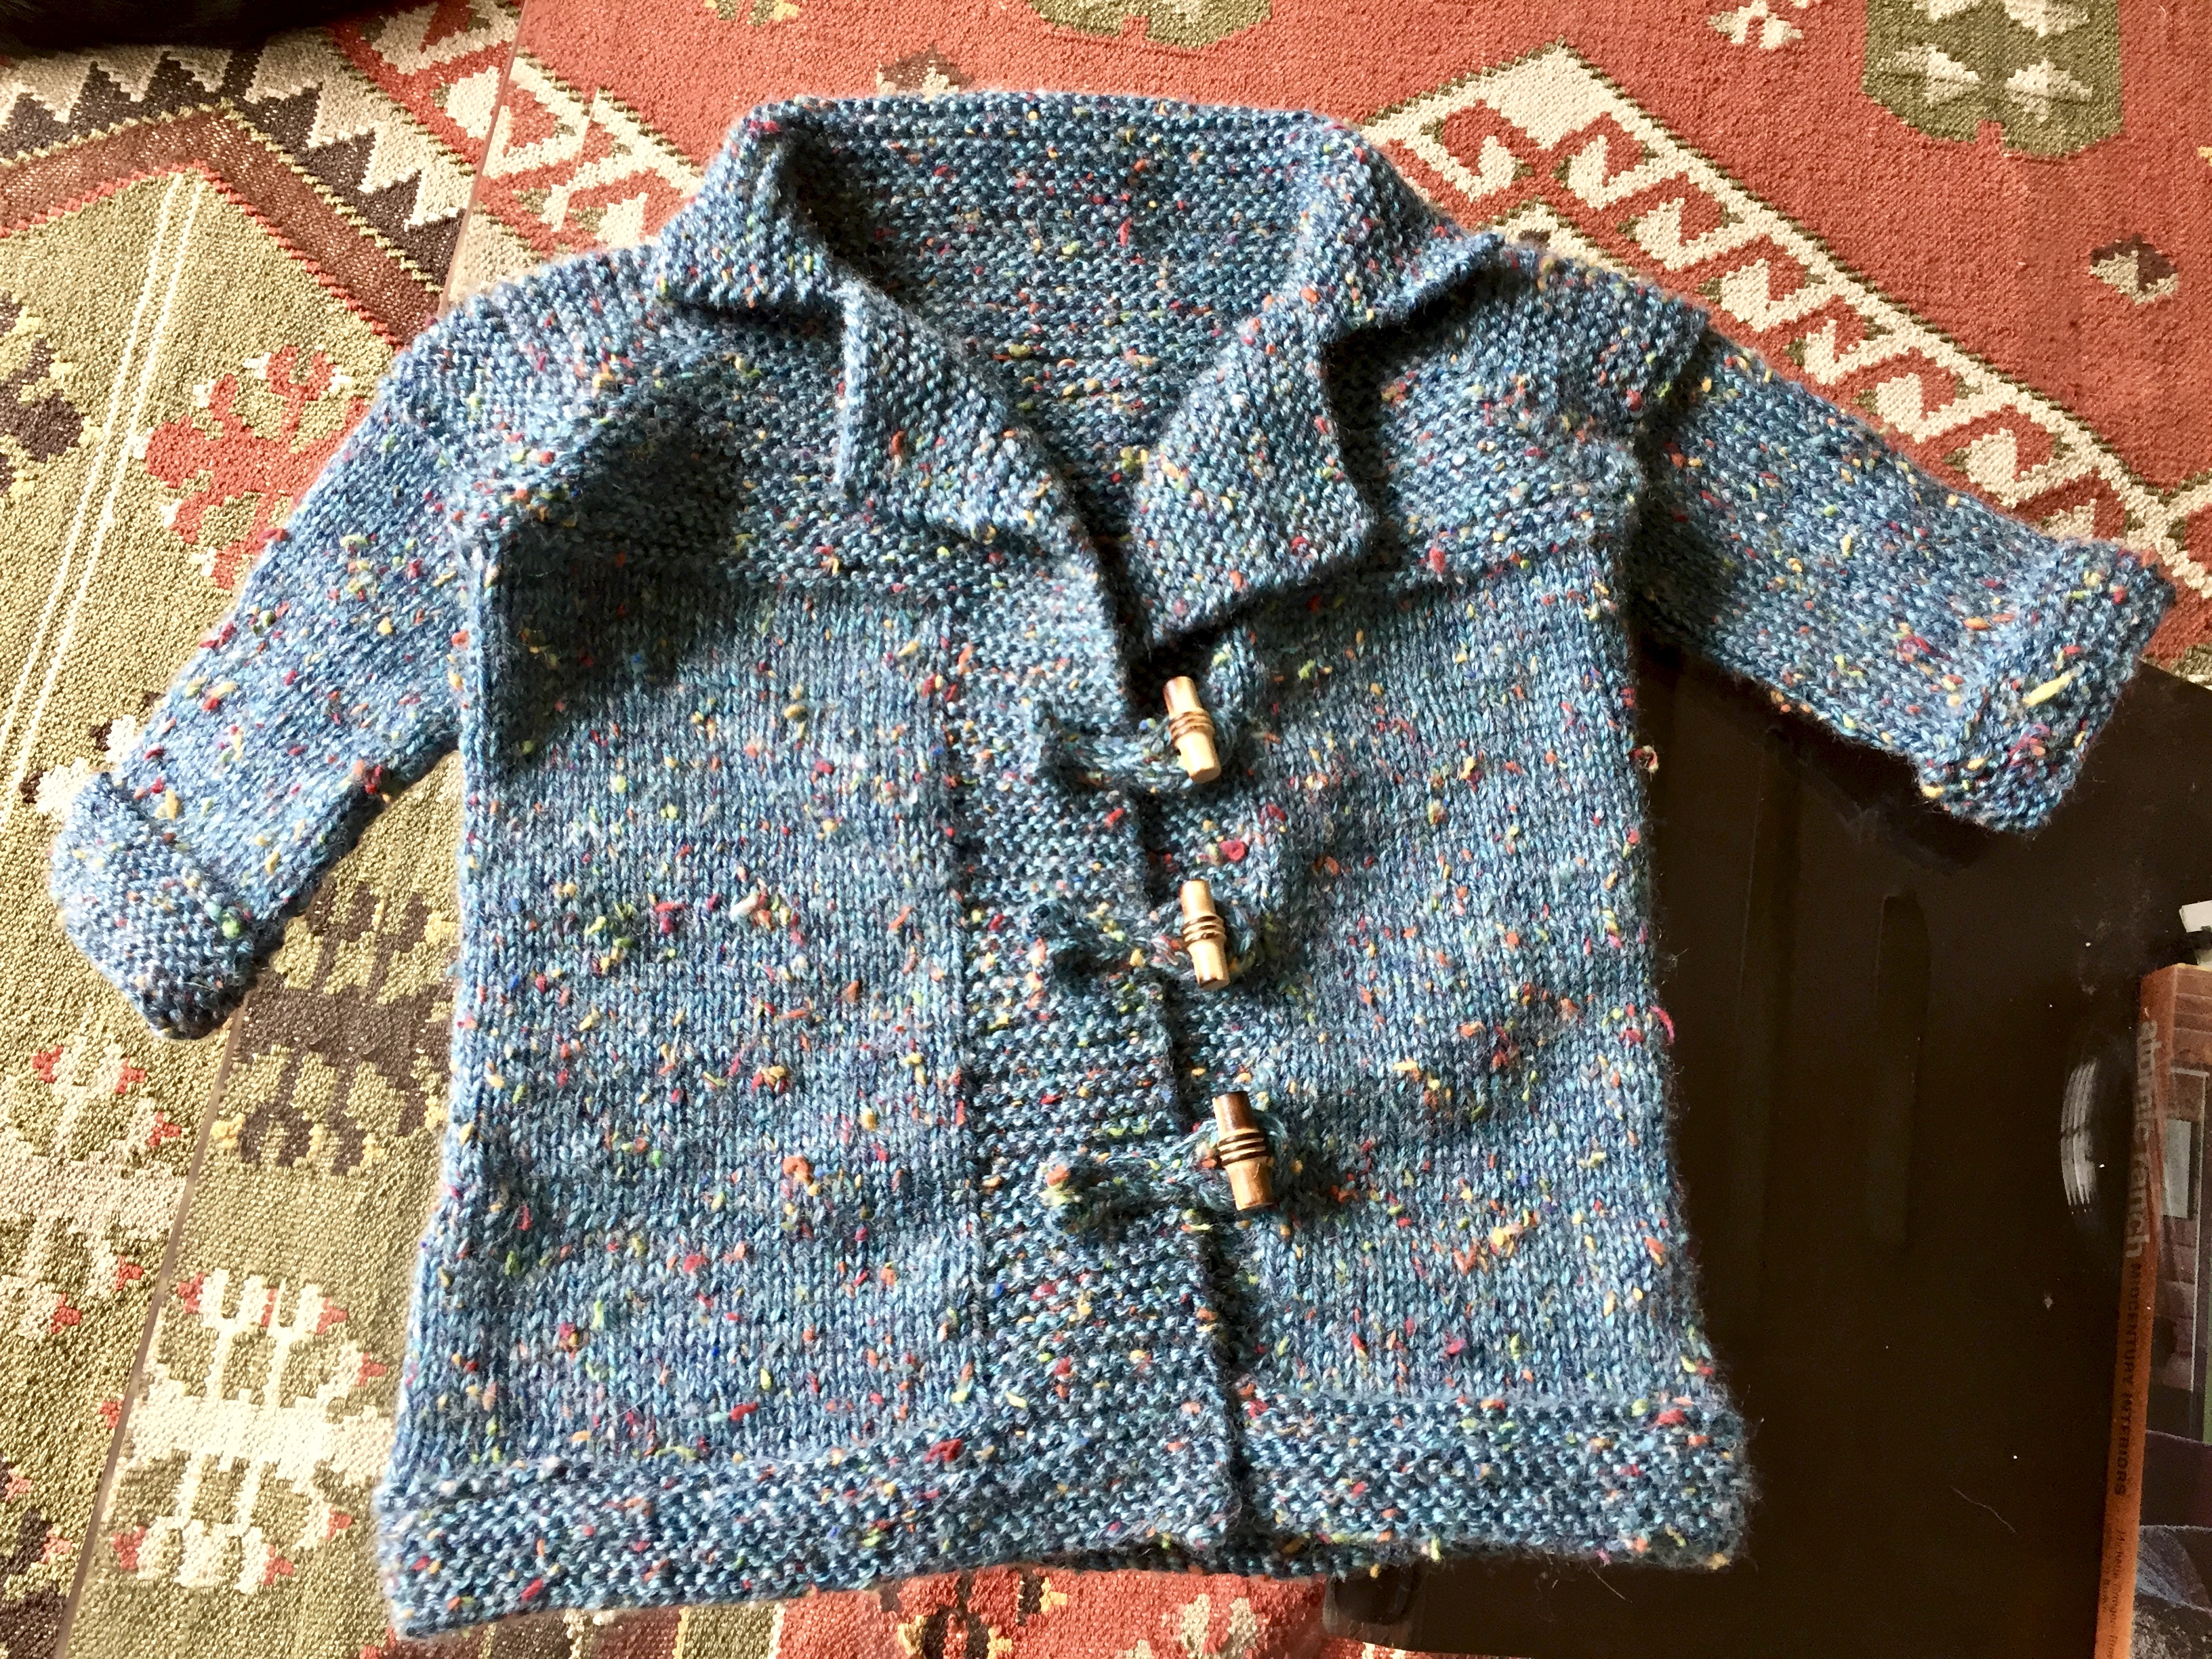
This mini Mackintosh Jacket will need to wait for the little one to grow into it. However, having the yarn piled into your lap is a nice way to stay warm. Here’s to making it to Halloween before turning on the furnace, wish me luck!
I love growing hot peppers and the jewels in the crown of my garden this year are the Tabasco Pepper and The Gong Bao Pepper. The plants were beautiful however I suspect their location did not deliver enough sunshine as the Anaheim’s were short and less abundant. I grew four kinds of peppers that are prepared in very different ways.
Serrano- eaten fresh red or green in salsa
Anaheim- roasted and diced, added to anything you want to have a little kick
Gong Bao- dried and crushed to eat on pizza, pasta and soups
Tabasco- mashed and fermented into a hot sauce
I will share more about the hot pepper sauce we are planning to make with the Tabasco Pepper but today I thought I would share how I am preserving my Gong Bao Pepper.
This slideshow requires JavaScript.
While the Serrano and Anaheim peppers are meant to be eaten green the Gong Bao are intended to be a brilliant red pepper with thin walls, good flavor and moderately intense heat. This plant was so beautiful and delivered red peppers in July and continues to produce into October. So that I don’t get overwhelmed I created some ristras.
Creating a ristra with needle, sturdy thread and gloves to protect my fingers from the hot juice.
This is a simple process of stringing the chilis together and hanging them in a dry airy place. In past years I have strung chilis by piercing them at their stem however when they dry the stems want to fall off and this can make the ristra more fragile. Here I simply pierced them in the middle of each pod and keep the needle attached so that I can add more as they ripen and are harvested. When full I tie it to some cardboard and start another. Don’t forget to wear gloves for this project the fresh chilis will emit juice when pierced with a needle.
Gong Pao Thai Chili ristras hanging in my family room alongside some rosemary and sage.
Eventually these will be dry enough to process into red chili flakes. The green stems are removed and the pods placed into a blender. Depending on the level of heat you enjoy you can remove some of the seeds for a milder effect. My husband likes to grind them with a spice/coffee mill and put it in a shaker so hot pepper can be added to everything.